When applying for a visa, one small detail can make or break your application: your photo. Many applicants overlook strict visa photo requirements, leading to unnecessary delays or even outright rejection.
In this guide, we’ll break down everything you need to know—from size and background rules to country-specific requirements—and highlight common mistakes to avoid.
Why Visa Photo Requirements Matter
Visa photos are used for identification and security purposes. Governments use advanced biometric systems to verify your identity, so even minor deviations from official guidelines can result in rejection.
Following the correct visa photo requirements ensures:
- Faster processing times
- Reduced risk of rejection
- Compliance with biometric standards
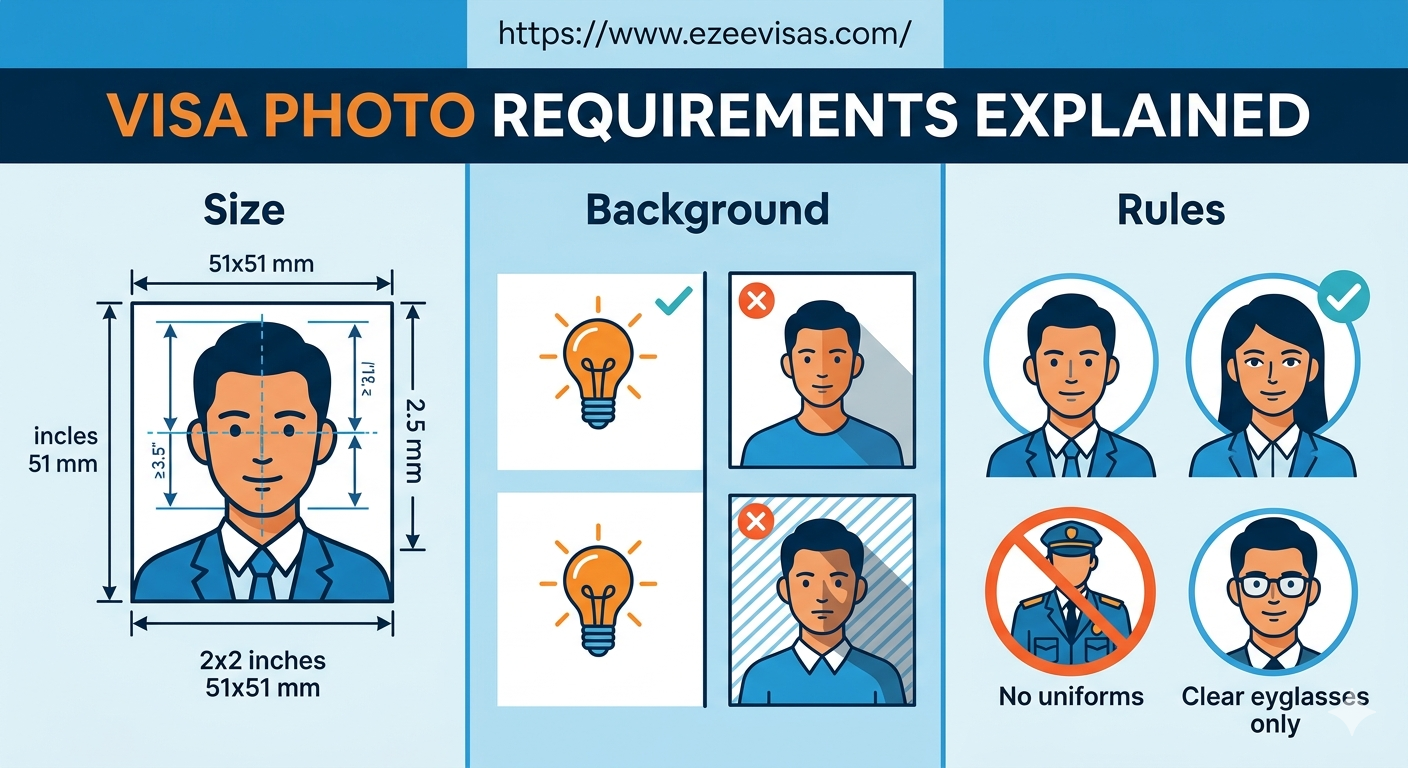
Standard Visa Photo Requirements
While requirements vary slightly by country, most visa photos follow these general guidelines:
1. Photo Size
The most common dimensions include:
- 35mm x 45mm (widely used globally)
- 2 x 2 inches (common for U.S. visas)
Make sure:
- Your face occupies 70–80% of the photo
- The photo is not cropped too tightly or loosely
2. Background Color
- Plain white or off-white background
- No patterns, textures, or shadows
- Uniform lighting is essential
3. Facial Expression
- Neutral expression (no smiling widely)
- Eyes open and clearly visible
- Mouth closed
4. Head Position and Alignment
- Face directly facing the camera
- No tilting or turning
- Both ears should be visible (in most cases)
5. Lighting and Quality
- No shadows or glare
- High resolution and sharp focus
- No filters or editing
6. Dress Code
- Avoid uniforms or camouflage
- Wear everyday clothing
- Religious attire is allowed but must not obscure facial features
Visa Photo Requirements by Country
Different countries may have slightly different specifications. Here’s a quick breakdown:
United States Visa Photo Requirements
- Size: 2 x 2 inches
- Background: White
- Digital photo required for online applications
- Glasses are not allowed
Schengen Visa Photo Requirements (Europe)
- Size: 35mm x 45mm
- Background: Light grey or white
- Face must cover 70–80% of the frame
United Kingdom Visa Photo Requirements
- Size: 35mm x 45mm
- Neutral expression required
- No head coverings unless for religious reasons
Canada Visa Photo Requirements
- Size: 50mm x 70mm
- Photographer details may be required on the back
- Strict clarity and lighting rules
Australia Visa Photo Requirements
- Size: 35mm x 45mm
- Clear, high-quality image
- No digital alterations allowed
Common Mistakes That Lead to Rejection
Even if your photo looks “good,” it might still fail official standards. Here are the most common mistakes:
❌ Incorrect Size
Submitting the wrong dimensions is one of the top reasons for rejection.
❌ Poor Lighting
Shadows on the face or background can disqualify your photo.
❌ Wearing Glasses
Many countries (especially the U.S.) do not allow glasses in visa photos.
❌ неправиль Background
Busy or colored backgrounds are not acceptable.
❌ Over-Editing
Using filters, smoothing apps, or Photoshop can lead to rejection.
❌ неправиль Head Position
Tilting your head or not facing the camera directly is not allowed.
Tips to Get Your Visa Photo Right the First Time
To avoid delays, follow these expert tips:
- Use a professional photo service when possible
- Double-check the official embassy guidelines
- Avoid selfies—use a proper camera setup
- Ensure correct lighting (natural light works best)
- Print photos on high-quality photo paper
Can You Take a Visa Photo at Home?
Yes, but you must be careful. If you choose to take your photo at home:
- Use a plain white wall
- Set up even lighting (avoid shadows)
- Use a tripod or stable surface
- Maintain proper distance from the camera
There are also online tools that help crop images to meet visa photo requirements, but always verify before submission.
Final Thoughts
Understanding and following visa photo requirements is crucial for a smooth visa application process. While the rules may seem strict, they’re easy to follow once you know what to look for.
Always check country-specific guidelines and avoid common mistakes to ensure your application is processed without delays.